Table Of Content
Creating an explainer video can feel overwhelming—believe me, I’ve been there. You’re trying to simplify complex ideas, grab attention, and keep costs down, all at once.
But here’s the reality – video consumption trends are growing, as 72% of people prefer learning about products through video, and businesses using explainer videos often see conversions jump by up to 20%.
I remember those early days in marketing, tangled in edits and skyrocketing budgets, feeling frustrated that my message kept slipping through the cracks.
But it doesn’t have to be this way. Therefore, I’ve created this guide to walk you through a step-by-step process to create professional, high-converting explainer videos—quickly, affordably, and without stress.
Ready to make it happen? Let’s jump in.
What is an Explainer Video?
An explainer video is a short, engaging video that introduces your product or service and breaks down its value in an easy-to-understand way. It’s like a quick pitch but with visuals that tell viewers about your offer, how it works, and why it’s worth their time.
Here’s what makes explainer videos so effective:
- Breaks down information in an easy-to-digest format.
- Gets straight to the point, ideal for short attention spans.
- Leaves a lasting impression on viewers.
- Helps turn curiosity into action by highlighting benefits clearly.
Moreover, you’ll often see explainer videos on landing pages, social media, and emails because they’re a great way to grab attention and keep people interested.
Types of Explainer Videos and Their Benefits
Not every explainer video format fits every goal. The format you pick sets the tone and can make or break how well your message relates to your audience. Here’s a breakdown of the most popular formats, each with its own unique power to engage, connect, and inform.
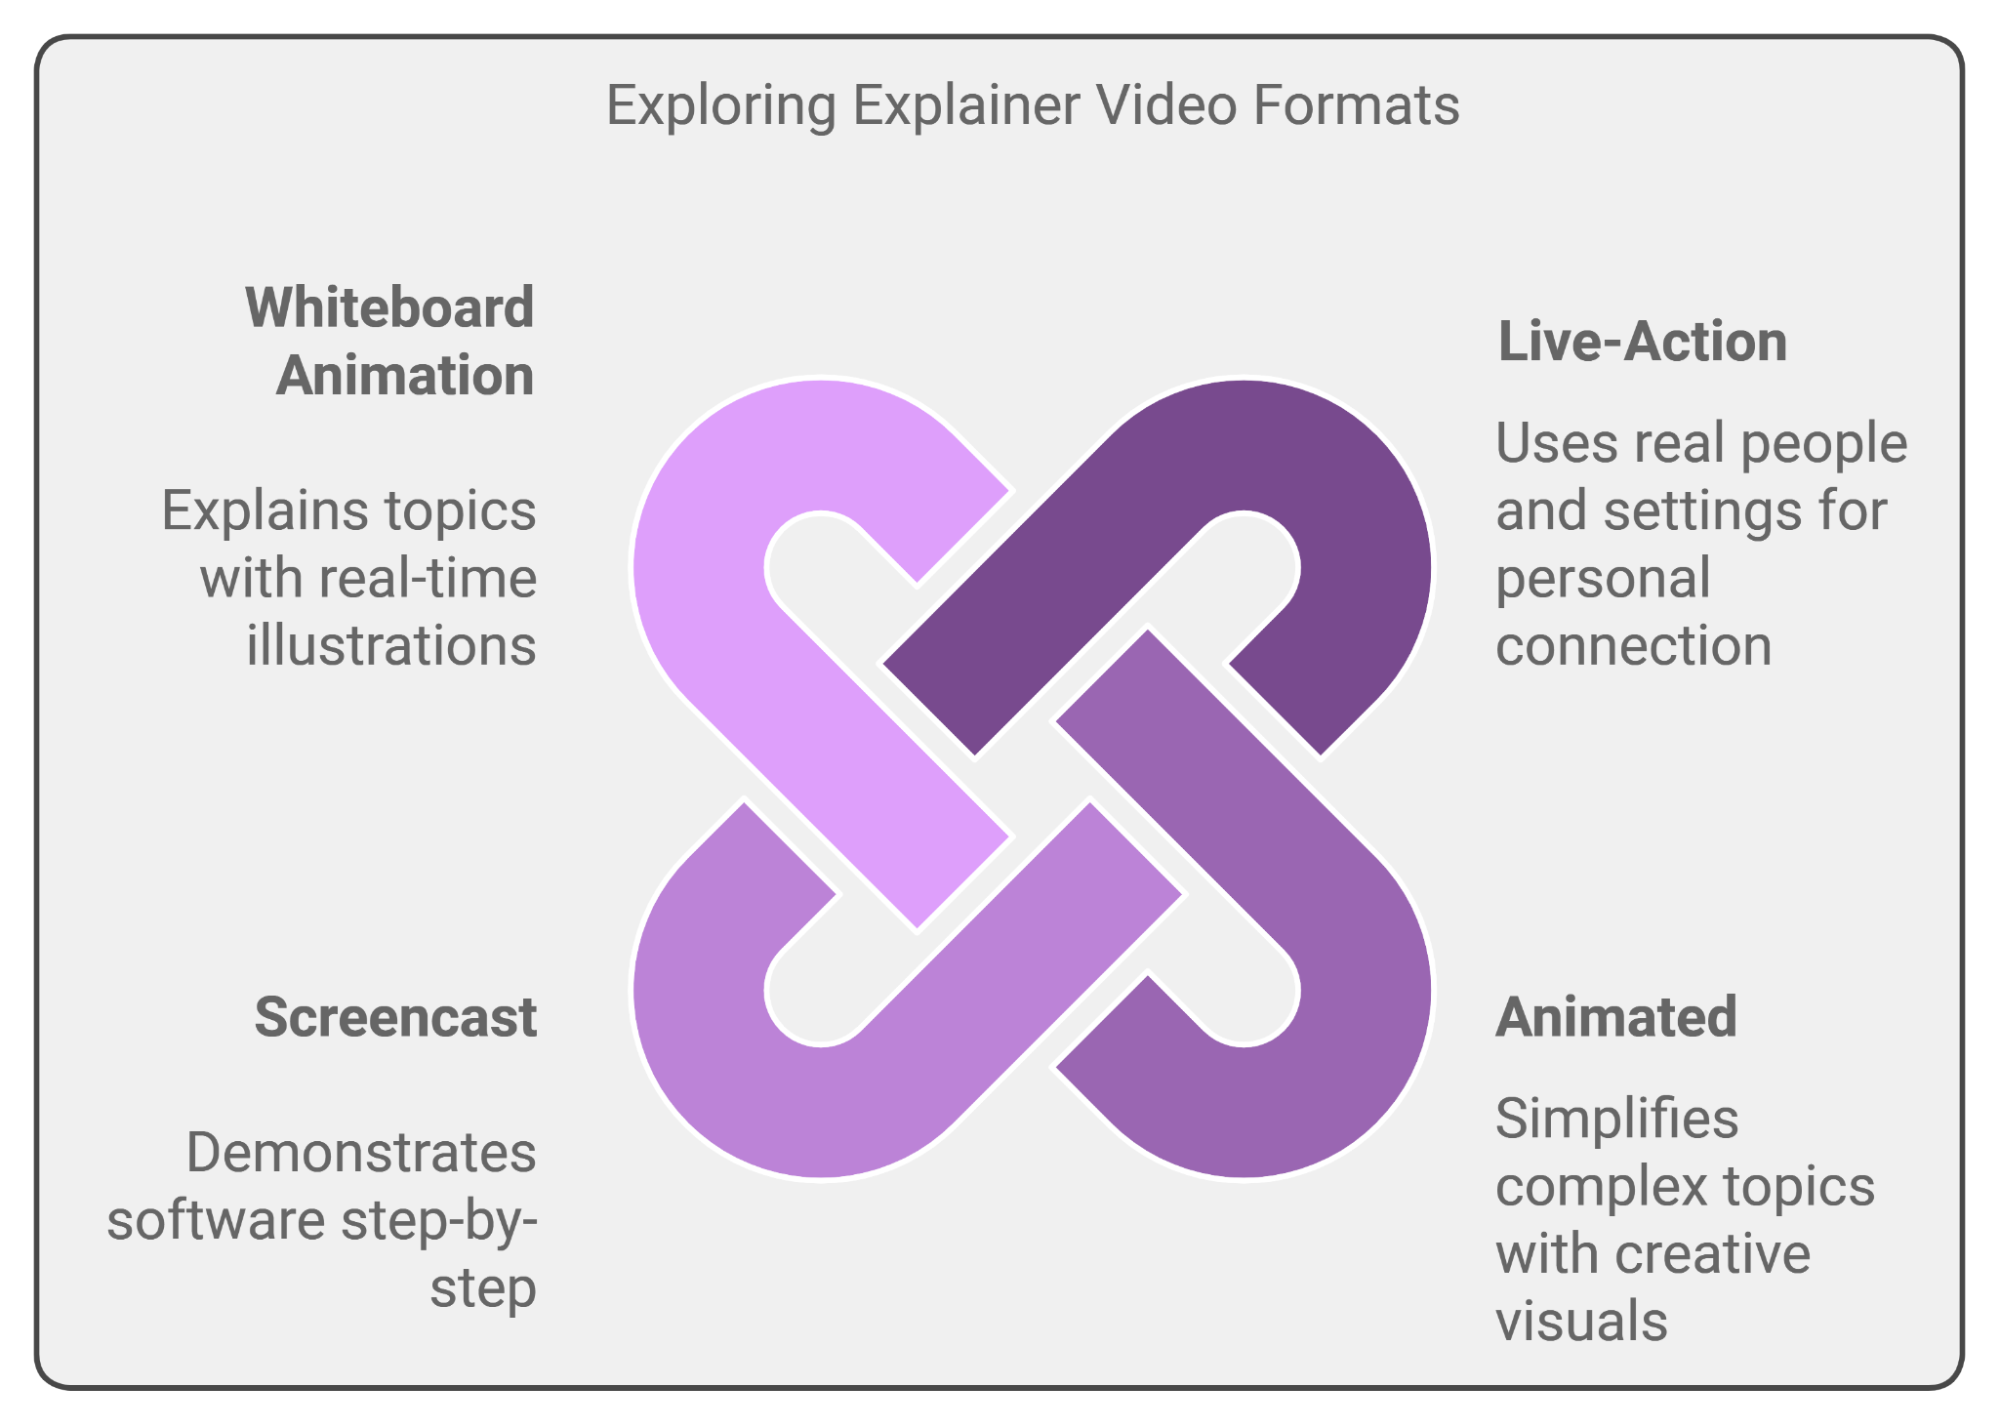
1. Live-Action Explainer Video
A live-action explainer video uses real people and settings to connect with viewers on a personal level. It’s perfect if your product or service benefits from real-life demonstrations.
For example, a live-action video featuring a chef using your kitchen gadget in action builds credibility and lets viewers see the product’s benefits firsthand. Moreover, this format also works well for small businesses wanting to showcase their team or founder to add a personal touch.
Here’s how we use a live-action explainer to show how to earn $10,000 per month by creating animated story videos with ChatGPT.
When to Use Live-Action
- When you want to build trust by showcasing real people.
- When your product needs hands-on demonstration.
- For businesses aiming to connect emotionally, like consulting firms or family-owned brands.
2. Animated Explainer Video
Animated explainer videos are ideal for turning complex topics into something simple and visual. With them, you can have complete creative control and represent abstract concepts in an easy-to-understand way.
They’re especially effective for tech products, SaaS tools, or services that don’t have a physical form.
For example, you can show how an app’s algorithm works or explain the value of a digital service without needing a physical demo.
Watch this Dropbox animated explainer video that highlights the common issue of file disorganization across multiple devices and how Dropbox provides a simple way to store and access files.
When to Use Animation
- For tech and software companies explaining abstract concepts.
- To showcase hypothetical scenarios or future products.
- When aiming to engage audiences with colorful, imaginative visuals.
3. Screencast Explainer Videos
Screencasts are perfect for demonstrating software or digital products in a step-by-step format. This type of video walks viewers through an actual interface so they can easily understand how your product works without having to imagine it.
For example, a screencast can guide users through signing up, navigating features, or completing tasks within the software.
Check out this screencast that guides viewers through the new platform using a static phone model with a recording of the app in action.
When to Use Screencast
- For digital products that require step-by-step guidance.
- To build confidence in users by showcasing practical functionality.
- For B2B and SaaS companies needing to educate and onboard users.
4. Whiteboard Animation Videos
Whiteboard animation videos are a classic way to explain complicated topics by drawing them out in real-time on a whiteboard (or a white background).
Your audience follows along as each part of the story unfolds through illustrations, which helps them understand complicated concepts step-by-step.
Its style feels casual and informative and it’s a popular choice for educational content.
Kitchen Sink Labs nails it with a clear, punchy message and animations that flow seamlessly with the script.
When to Use Whiteboard Animation
- For educational content that benefits from step-by-step visuals.
- To simplify complex topics like timelines, processes, or statistics.
- When you want a clear, no-frills visual style that keeps viewers focused on the message.
In addition, we have also covered all types of video that you can explore to master video editing.
A Step-by-Step Guide to Creating an Explainer Video as a Beginner
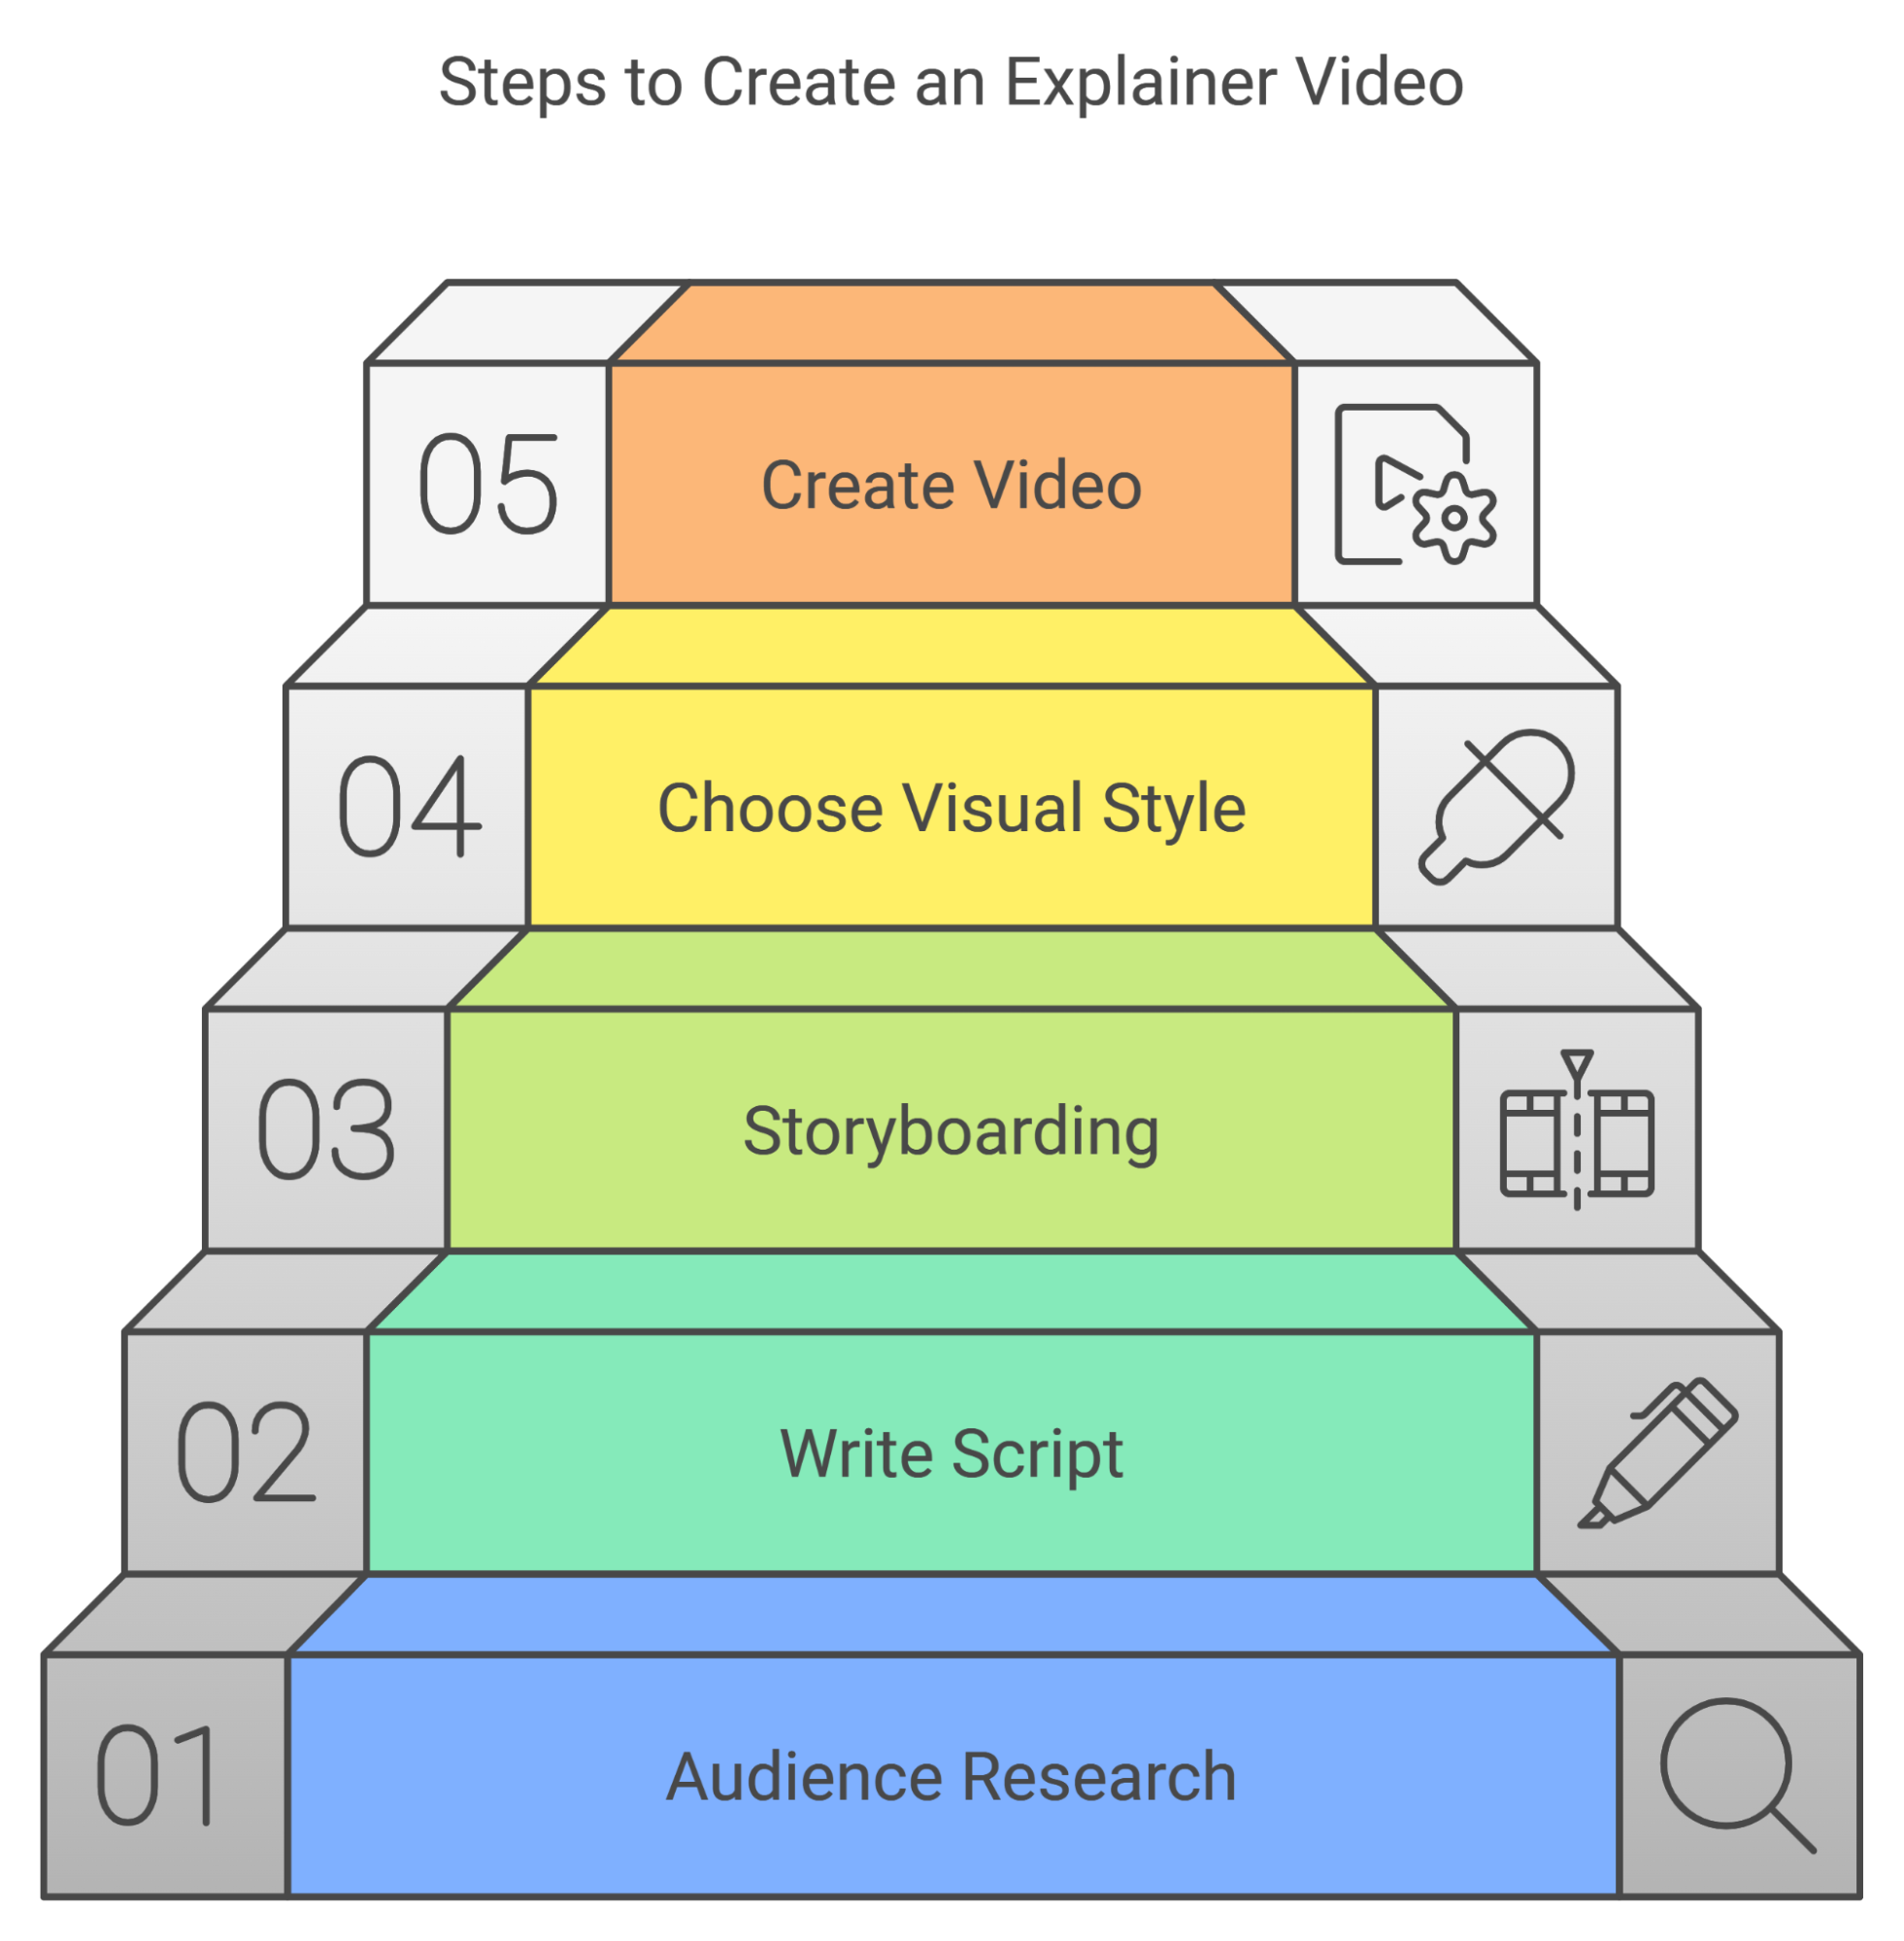
Creating a compelling explainer video involves a lot more than just slapping visuals together. I’ve been in the video content creation game for years, and the best explainer videos have one thing in common: they’re simple, clear, and connect with the audience on a human level.
Let’s walk through the steps to create one, using my go-to approach for keeping things relatable, effective, and time-efficient.
Step 1 - Do Audience Research and Define Your Video Purpose
Every effective explainer video starts with getting to know your audience like they’re a friend you’ve known for years. Who are they? What problems are they facing?
While doing research for my own videos, I dug into forums, product reviews, and YouTube comments to see the real pain points people discuss, the questions they’re asking, and the language they use.
Once you have this understanding, define the core purpose of your video. Ask yourself:
- What’s the main takeaway you want viewers to leave with?
- Are you aiming to inform, inspire, or sell?
- What’s the main action I want viewers to take after watching?
These questions help shape your message, tone, and even the visual style—whether that’s live-action, animation, screencast, or whiteboard.
Moreover, clarifying your goals upfront keeps your video focused and effective from start to finish.
Step 2 - Write Script
The script is the heart of your video. It brings all of your research together and translates into a story that flows naturally.
I have found that the best scripts don’t jump straight into the product's features. Instead, they begin with the problem – something that your audience can nod along with.
Then, focus on how your product or service solves that problem simply and directly. Don’t overdo the technical details—think of your video as a “conversation,” where you introduce a solution in the way you’d explain it to a friend.
One of the biggest mistakes I see people make is writing scripts that are too long. Attention spans are short, so every sentence should serve a purpose.
Back in the day, I’d spend hours refining scripts to make sure they weren’t bloated or bogged down with jargon. Now with the Zebracat script writing feature, you can instantly generate scripts with a single prompt thus turning what used to take hours into a few quick steps—saving time without sacrificing quality.
Step 3 - Storyboarding
Once your script is ready, it’s time to storyboard. Meaning visually map out how each scene will look and flow.
Early in my career, I’d often see people skip this step, thinking it wasn’t necessary. But storyboarding saves you a lot of trouble down the line by helping you plan the visual flow.
It doesn’t have to be a work of art. Simple sketches can do the trick. The idea is to plan the visual pace so that it aligns with the tone and message of your script.
Zebracat has a scene generator that takes your script and suggests visual scenes automatically. It’s a huge time saver and lets you quickly visualize your script without spending hours creating a detailed storyboard by hand.
A professional-looking storyboard helps you make adjustments before diving into full production so that every scene flows seamlessly into the next.
Step 4 - Choose Your Visual Style
Choosing the right visual style can be a make-or-break decision. Over the years, I’ve found that the style of your video should always reflect the core message.
- Animation is fantastic for tech or SaaS products because it lets you show abstract ideas visually.
- Live-action is ideal for services where you want to show real-life applications.
- Whiteboard videos are excellent for step-by-step explanations or educational content.
- Screencast videos are unbeatable for software demos or product walkthroughs.
If you’re working with Zebracat, it’s easy to experiment with styles. It lets you test animations and integrate real footage without the hassle of switching between different tools.
Step 5 - Create Your Video
Now comes the fun part—actually creating your explainer video!
With Zebracat, the process is straightforward and efficient because it cuts down on the usual time and complexity without sacrificing quality. Here’s a step-by-step process you can follow to create your AI videos for YouTube with Zebracat.
- Briefly describe what your video is about in a sentence or two so that Zebracat can understand your main message.

- Pick the format that fits best for where you’ll share it—9:16 (vertical), 1:1 (square), or 16:9 (landscape).

- Choose a voice that matches your message’s tone and language. There are natural-sounding AI voices to fit any style. Make sure captions are activated.
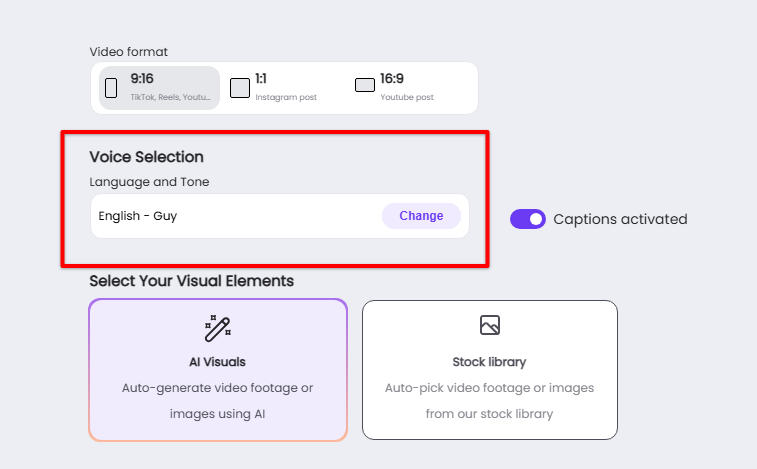
- Choose your visuals. Go with AI-generated visuals for a custom look, or pick from the stock library.
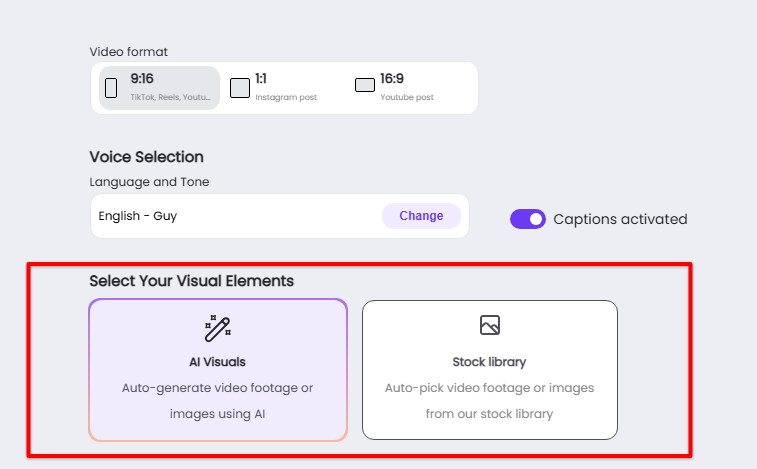
- If using AI visuals, select the specific style that suits your topic.

- Set the video length and pick the background music mood.
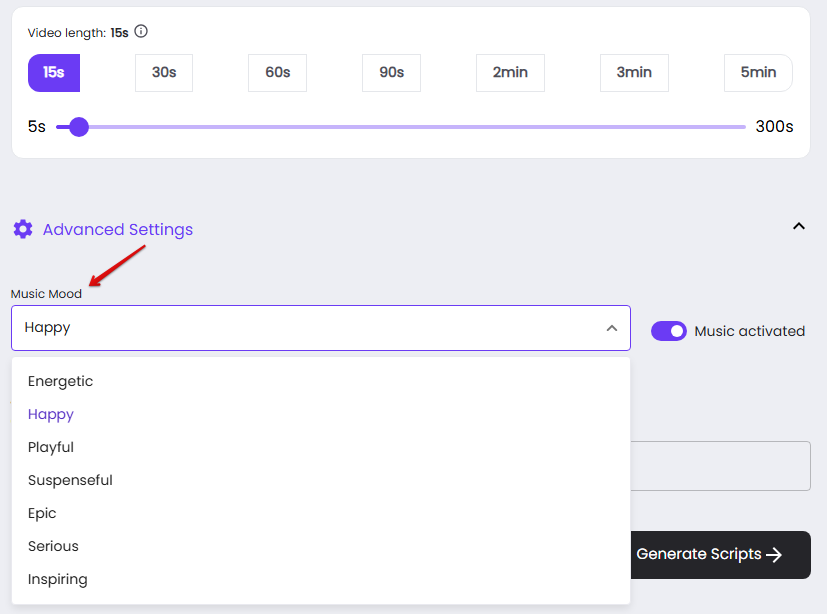
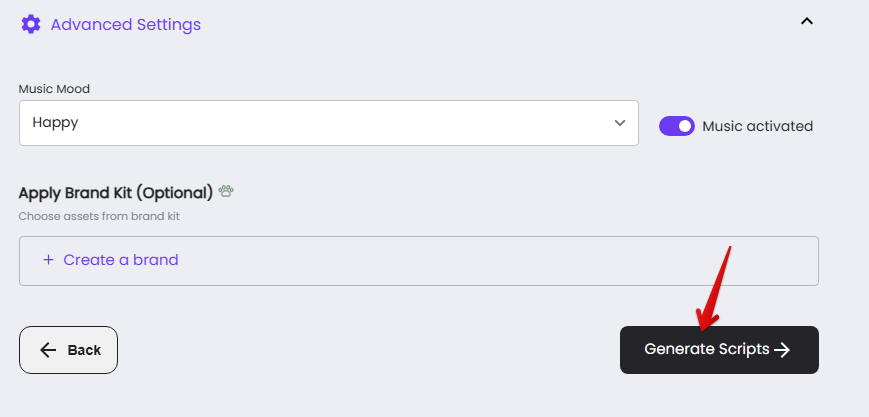
- Click “Generate Script,” and let Zebracat create scripts based on your description.
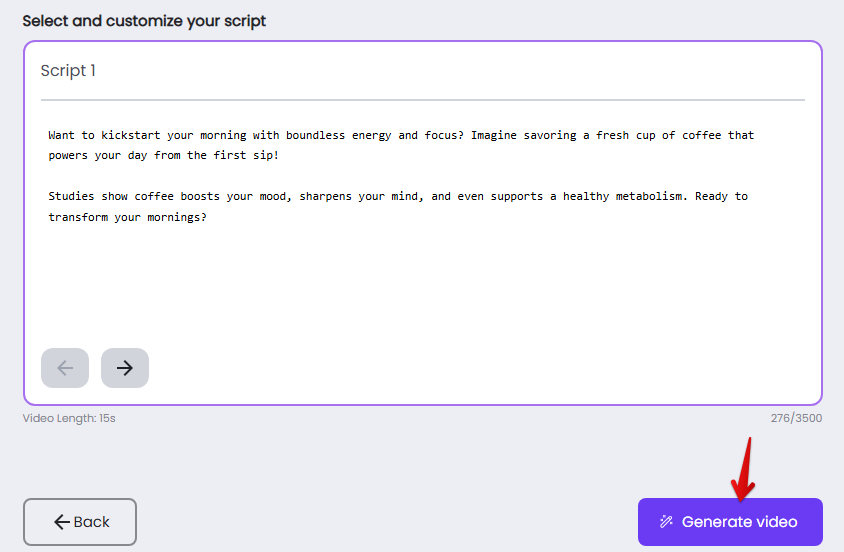
- Review the scripts, pick the one that works best, and click “Generate Video.”
- In under five minutes, Zebracat will produce a polished explainer video, ready to share!
The Cost of an Explainer Video
The cost of an explainer video ranges from $700 to $250,000, depending on the complexity of the animation, production quality, company reputation, and additional services offered.
Drawing from my research and extensive experience working with multiple clients, here’s a comprehensive breakdown of what you can expect when budgeting for an explainer video:
- Budget-Friendly—If you’re starting small, videos priced at $700 can be a lifesaver. They come from smaller studios or freelancers and are perfect if you need something straightforward without breaking the bank.
- Mid-Tier—For professional 60-second videos, expect to pay $2,500-$10,000. This range includes polished animations, gripping voiceovers, background music, and some customization. The industry average is about $8,457, a sweet spot that balances quality and cost.
- High-End—If you’re aiming for something truly impactful, prepare to invest $70,000. Some agencies even go as high as $250,000 for custom scripts, intricate character designs, and jaw-dropping animation techniques.
Even if considering the budget-friendly options that start at $700, Zebracat's Cat Mode still chops your cost down by about 97%. It’s a huge win for your wallet.
Where to Publish and Promote Your Explainer Video
You’ve poured time, effort, and probably a fair chunk of money into creating an explainer video. Now comes the critical part—publishing and promoting it.
Where you choose to showcase your specifically how to video ideas or any other type of video can make all the difference between crickets and a surge in engagement.
Let’s break down the 4 top platforms to consider and how to maximize your reach.
#1 - YouTube
YouTube is a no-brainer when it comes to video content. With over 2.5 billion active users, the platform can amplify your reach like no other.
Its algorithm is designed to favor videos that keep viewers engaged, so make sure your explainer video is concise, attention-grabbing, and offers value from the first frame.
Pro Tips 🔥
- Optimize your video title and description with relevant keywords and timestamps. I once uploaded an explainer video for a startup, and adding timestamps to highlight key points bumped up watch time by 30% in just one week.
- For thumbnails, use bright colors, readable text, and a bit of intrigue.
- Also, to boost engagement, add “Subscribe for more insights” or use end screens that nudge people to watch another video.
#2 - Instagram
Instagram is ideal for reaching a younger, visually-driven audience. Short video snippets or teasers of your explainer video work well here, especially with reels and stories.
How to Make It Work? 🎯
- Reels = Big Reach - Snip out a key part of your explainer and turn it into a Reel. Keep it under 30 seconds and hook viewers in the first few moments.
- Stories for Teasers - Use stories to share short clips. But instead of just posting a clip, tell a story over multiple frames. Start with a “hook” slide like “Feeling suck because your website isn’t converting?”, then use the next slide to introduce your explainer video with a teaser.
- IGTV and Carousel Posts - For longer content, IGTV still works, and carousel posts are perfect for breaking down a step-by-step process. Take a look at how Wonderlust TV nailed it:
https://www.instagram.com/p/DBJrvvsgnmQ/?igsh=MXE5a3d3ZnV1dm42cQ==
#3 -Your Company Website
Your website is your home turf. Embed your explainer video right on your homepage or product pages to catch eyes and hold attention.
Why Is It Essential? 💡
- First Impressions - People spend 88% more time on a site that has video. Place it above the fold so visitors see it immediately.
- Landing Page Power - Got a special feature or service? Create a landing page with the video front and center. It’s like having a 24/7 sales pitch.
#4 -Facebook
Facebook might not have the same sparkle it used to, but it’s still a strong platform for video, especially if you use its ad capabilities.
How to Approach It?
- Native uploads are a Must. Never link your video from YouTube or another platform. Upload your video directly to Facebook. Why? Facebook’s algorithm prefers native content, which will give it a better organic reach.
- Timing Is everything. Yes, Facebook’s algorithm works even if people aren’t online when you post. Data from Hootsuite’s best time to publish feature has shown that posting when your audience is active boosts engagement.
- Engage with your audience like you mean it. When someone comments on your video, respond to them. The algorithm notices when a post has active back-and-forth interactions. Your audience wants to feel heard, and Facebook loves showing posts that foster conversation.
Common Mistakes to Avoid When Creating Explainer Videos
Creating an explainer video is more than just piecing together visuals and adding a voiceover—you need to create a smooth, engaging experience that holds the attention and delivers a clear message.
Over the years, I’ve seen firsthand how small missteps can derail even the best intentions. These are the most common pitfalls in explainer video creation and, more importantly, how to avoid them to keep your audience truly connected to your story.
Mistake #1- Overloading with Information
It’s tempting to try and pack everything into your video, but cramming too much in can backfire. Explainer videos are meant to distill your message down to its essence.
When there’s too much information, viewers get overwhelmed and may tune out before they even reach the main point. Data show that almost 50% of viewers drop off within the first minute if the content feels too dense or complex.
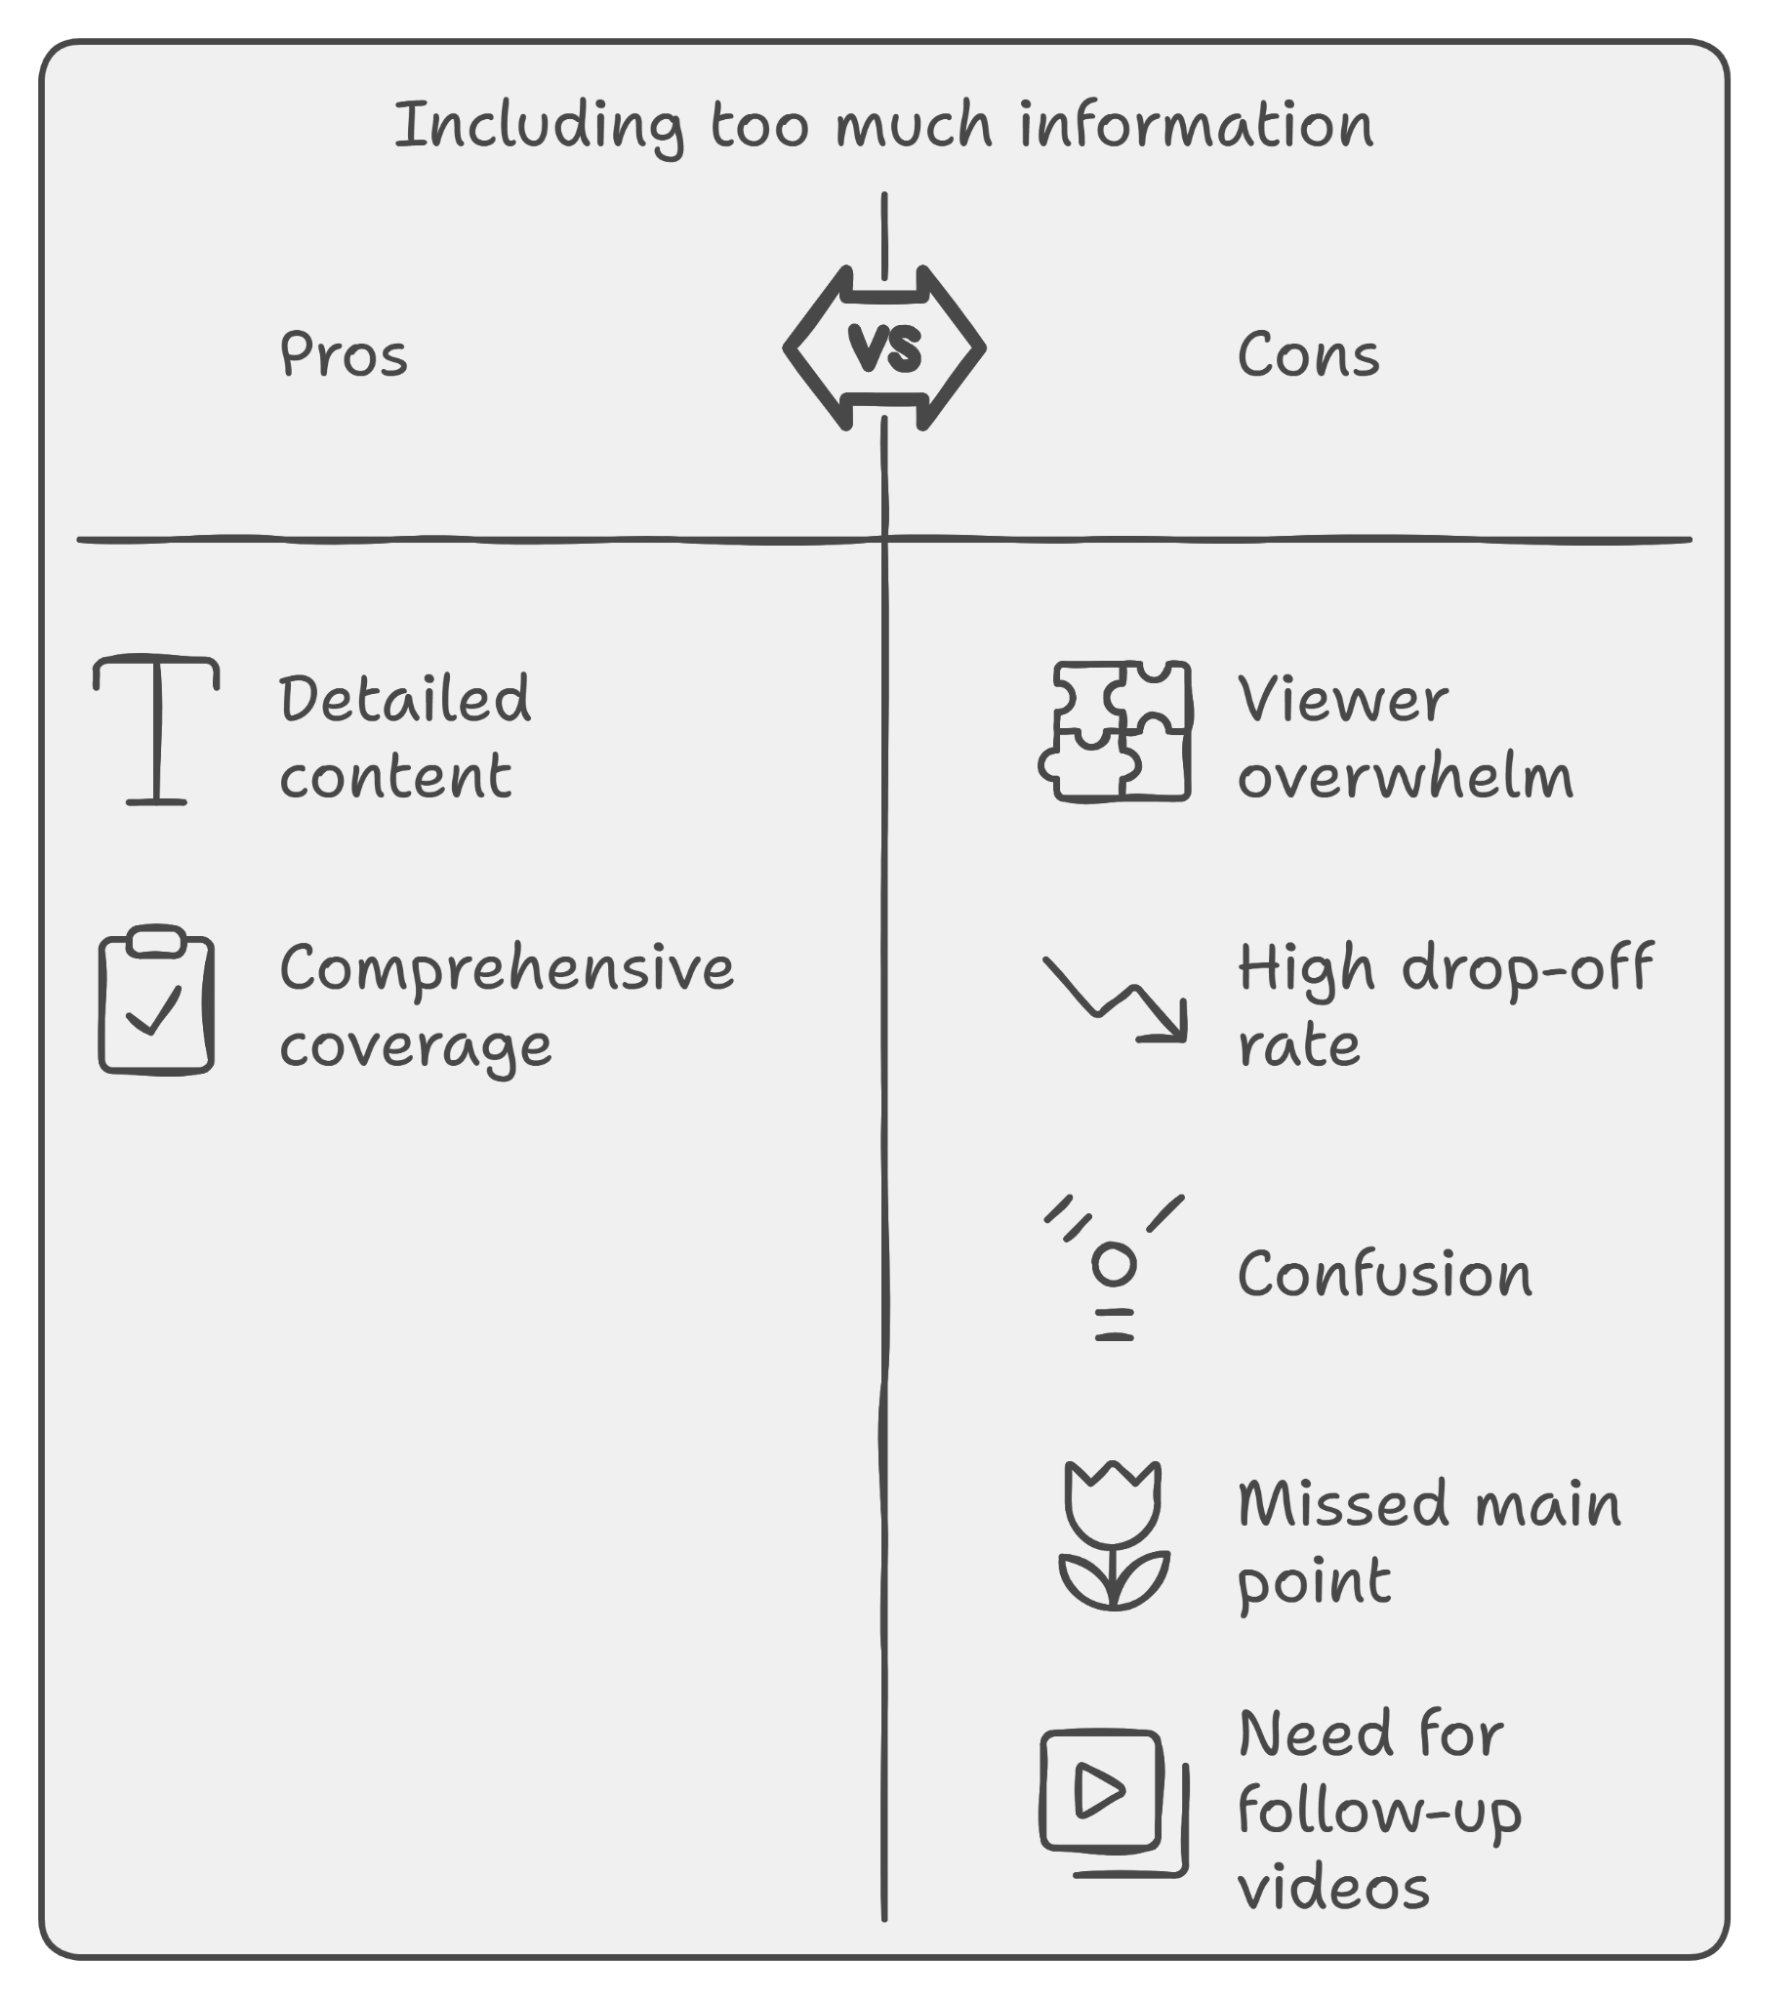
So How to Avoid It?
Focus on one core message. If there are more details to share, consider creating additional videos or follow-up content that digs deeper. Keep in mind that the goal is to give viewers just enough to leave them wanting more.
Mistake #2- Using Low-Quality Voiceovers and Audio
Audio quality has a surprising impact on how people perceive your video. A low-quality or robotic-sounding voiceover can make the whole video feel cheap and unprofessional.
The voice should feel natural and fit the tone of the video. If it sounds off, viewers will likely click away, no matter how great the visuals are.
How to Avoid It:
Invest in a clear, natural-sounding voiceover. If you’re recording it yourself, make sure you’re using decent equipment in a quiet space.
Choose a tone that matches your brand and feels conversational, as if you’re speaking directly to the viewer.
Mistake #3- Poor Visual Consistency
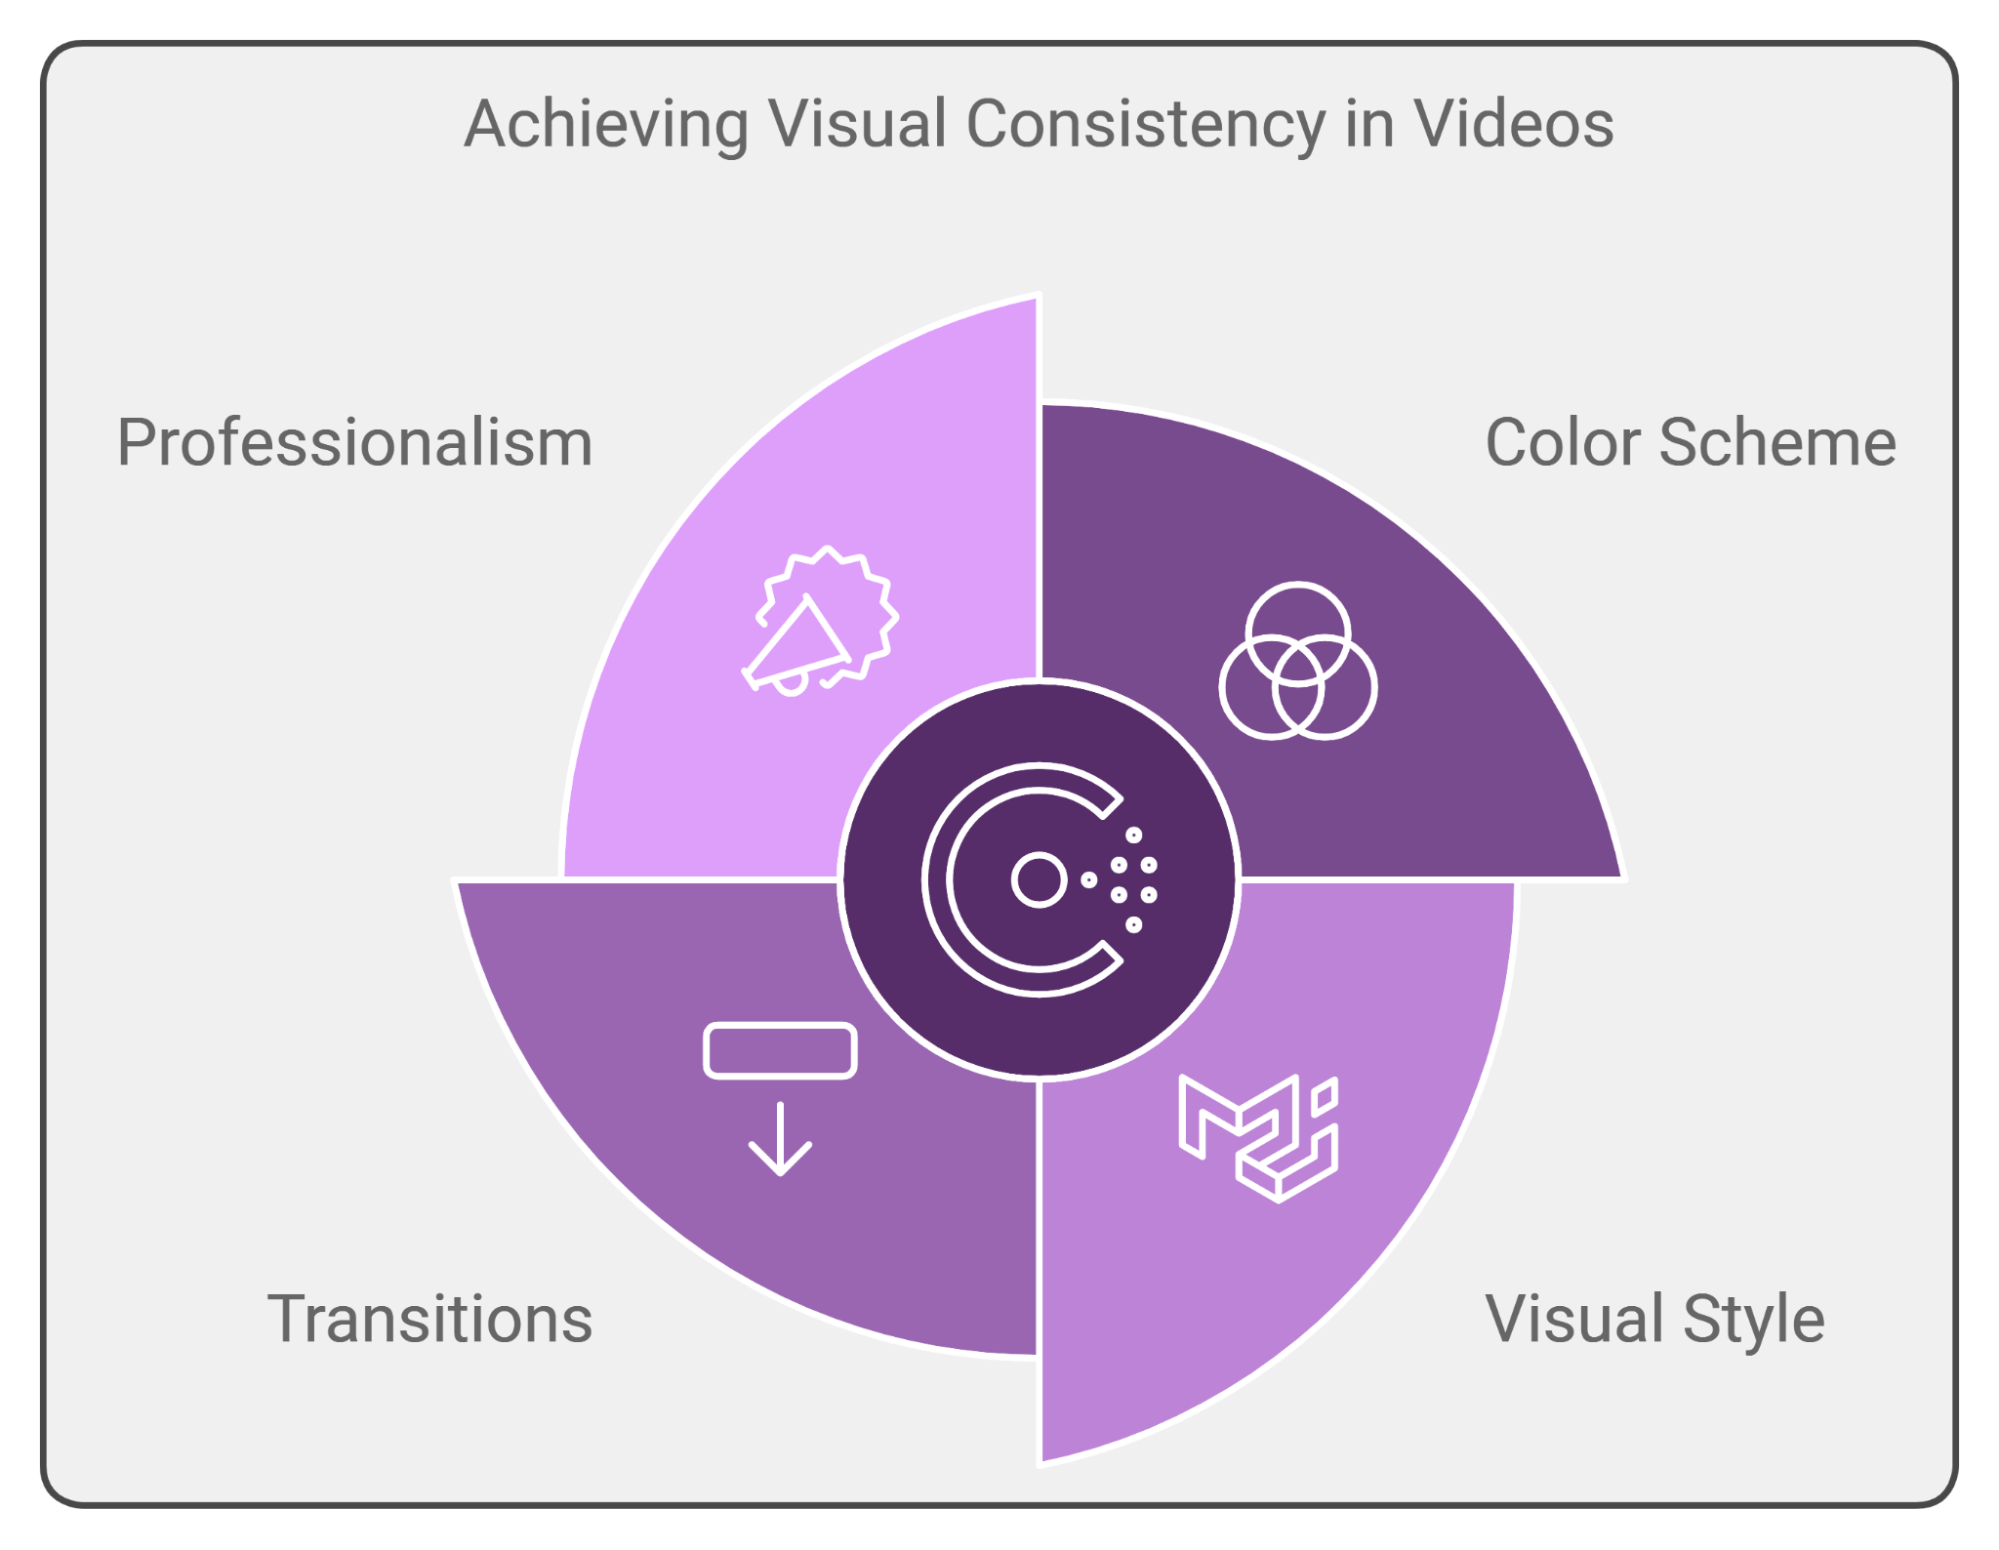
Inconsistent visuals can throw off viewers, making your video feel chaotic or unfocused. Research shows that visually cohesive videos improve viewer recall by up to 65% because they’re easier to follow and process.
When styles, colors, or transitions clash, it disrupts the flow and dilutes the brand message, making it harder for viewers to stay engaged.
How to Avoid It:
Stick with a color scheme and visual style that reflects your brand. Choose a limited palette and use it consistently across scenes. Remember, consistency builds professionalism and helps viewers stay focused on what you’re saying.
Mistake #4- Forgetting About Engagement
A well-crafted message can still fall flat if it isn’t engaging. Today, 80% of people prefer watching a video to reading text, yet over half will leave if the video isn’t compelling enough. If the visuals or pacing are too slow, viewers may lose interest and move on before the end.
So How to Avoid It:
Start with a hook that grabs attention in the first few seconds. Keep the visuals moving but balanced—too much action can feel overwhelming, while too little can feel dull. Think of your video like a conversation. Keep the pace lively and natural.
Mistake #5- Spending Too Much Time on Edits
Editing can be a huge time drain. With endless options for tweaking transitions, cuts, and effects, it’s easy to get lost in the details and end up wasting hours without adding much value.
Spending too long on edits can also mean you’re not able to publish content quickly enough to stay relevant.
How to Avoid It:
Focus on the essentials. Get the main transitions and cuts right, and then step back. Often, aiming for a “good enough” first draft lets you stay on schedule. You can always refine in later versions if necessary, but don’t let perfectionism slow you down.
How Can Animations Enhance an Explainer Video?
Animations make explainer videos clearer and more memorable. They turn abstract concepts into visuals that are easy to understand and show processes that static images can't.
Plus, the creators illustrate scenarios that are impossible to film Best of all, animations can be more budget-friendly than traditional video shoots which makes them a smart choice for high-quality explainer videos.
FAQs
How Long Should an Explainer Video Be?
The ideal length for most explainer videos is between 60 to 90 seconds. However, it varies. For short ads, 30 seconds is ideal, while more detailed content like product demos can extend up to 2-2.5 minutes.
Which Software Is Best for Editing Explainer Videos?
For professional-quality explainer videos, Adobe Premiere Pro and Final Cut Pro are top picks due to their powerful editing features and flexibility. For simpler, user-friendly options, Camtasia and Animoto are great for quick edits and efficient workflow.
What Is the Best Aspect Ratio for Explainer Videos?
The best aspect ratio for explainer videos is typically 16:9 for a widescreen format, as it works well on YouTube, websites, and most social media platforms.
For Instagram and TikTok, 4:5 or 9:16 is better for optimizing screen space and engagement.
Ready to Make Your Explainer Video?
Creating an explainer video is one of the most effective ways to connect with your audience and leave a lasting impression.
And I know—getting it just right can feel like a challenge. I remember the days when making each video took countless hours and a huge budget, with endless back-and-forth edits.
Now, with tools like Zebracat, the process is faster, easier, and—most importantly—effective. You don’t need a big team or days of work—just an idea and a few clicks. Zebracat takes care of the heavy lifting—scripting, visuals, voiceovers—so you can skip the usual production headaches.
Therefore, if you want to make professional explainer videos without any hassle, give Zebracat a try. It’s everything you need to create a high-quality video, quickly and easily.
Your message deserves to shine—why not make it effortless?
Create videos 10x faster and easier with Zebracat
Try it now

.png)


-p-130x130q80.jpeg)
Comments